Understand what a microcontroller is and how they are used
Develop skills sending and receiving information from a microcontroller
Time required: 30 minutes
Prerequisite skills: None!
Introduction to Microcontrollers:
What is a microcontroller?
A microcontroller is a mini computer that can be used to control other devices by sending and receiving electrical signals from them. For example, an LED can be blinked through a connection to a microcontroller. You can send custom instructions to turn the LED on and off in the form of computer code. Sensors can also be operated through a microcontroller with instructions that tell the sensor when and for how long to take measurements.
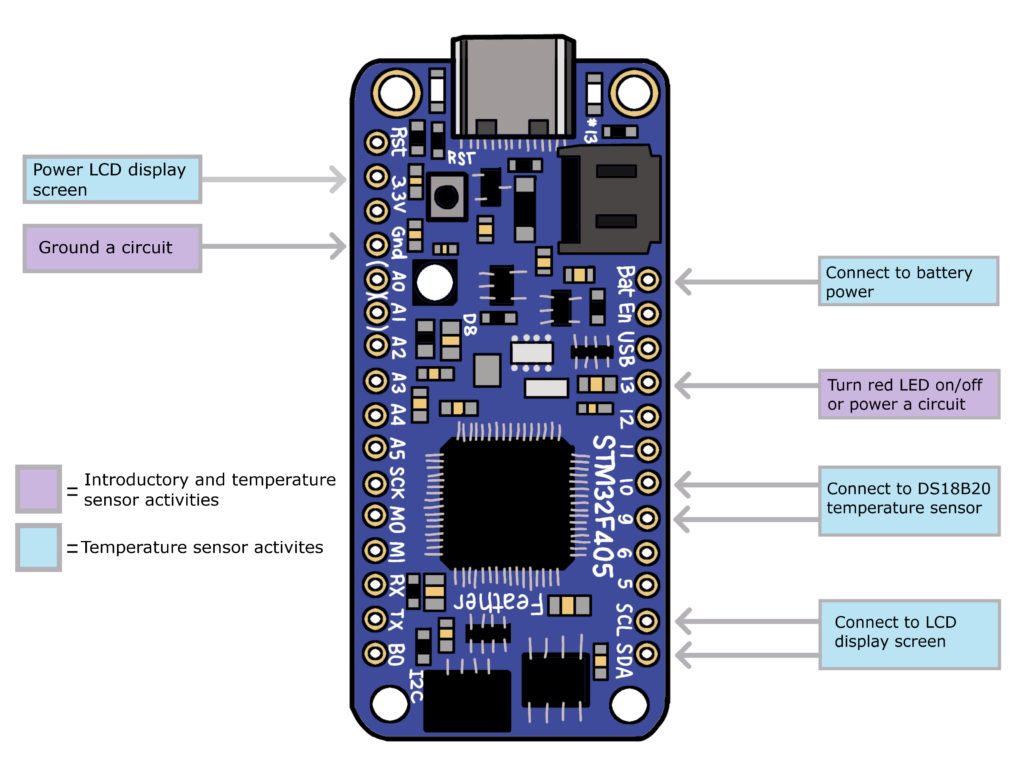
To send and receive messages from other devices, microcontrollers send signals through General Purpose Input/Output pins (GPIOs). Each of the labeled pins on your microcontroller is a GPIO which is available for sending and receiving signals. In the following activities, you will use GPIO pins to create electrical circuits. The diagram below shows the GPIOs you will use in PublicSensors activities color coded by activity.
Figure 1.8
Audio Read Along: Introduction to Microcontrollers
Connect to your microcontroller:
Use the USB cable to connect the microcontroller to your computer. Plug the USB-C end into the port on the microcontroller, and plug the USB end into a USB port on your computer. If your computer only has USB-C ports, you can use a USB-C to USB-C connector.
Once plugged in, the microcontroller should appear as a USB drive called “PYBFLASH”. You can open the folder to look at the files on the board. Don’t delete any files! If you delete any by accident, you can download them from Code resources page and drag and drop them on the board’s file system.
Open Thonny to communicate with your microcontroller directly. Use the Thonny Guide to get set up with this program that will let you send commands to the microcontroller.
IMPORTANT: To disconnect the microcontroller from the computer, do not just unplug it! Eject it as you would a flash drive and make sure it is safe to eject.
Note: If at any point you are having trouble with Thonny or you code isn’t working, try a soft reboot using Ctrl+D
Exploration:
Try interacting with the microcontroller by turning LEDs on the microcontroller (on- board LEDs) on and off.
To turn on an on-board LED type “from machine import Pin” and press enter. This loads a method called Pin from the library called machine which is required to interact with GPIOs. The on-board LEDs are already connected to specific GPIOs such that when you turn on that GPIO, you also turn on the LED associated with it.
2. On your microcontroller, Pin 13 is connected to a red color LED. Before we can turn on the LED, we need to initialize its GPIO. To do this, type “p13 = Pin(‘D13’, Pin.OUT)” and press enter.
3. Now that you have initialized Pin 13, you can control whether it is turned on or off. Type “p13.value()” and then press enter to see if the pin is currently turned on or off. A value of 1 means the pin is turned on and powered with 3.3 volts. A value of 0 means the pin is turned off and set to 0 volts.
4. What is the current value of Pin 13? Does this mean it is turned on or off?
5. To turn Pin 13 on, type “p13.value(1)” and press enter. This command assigned the value of 1 to the pin, which sends power to it. You should see the LED light up. Now try turning the LED off by typing “p13.value(0)” and pressing enter.
6. Press the up arrow on your keyboard to display the most recent command you typed again. Press enter to run it. Using the up arrow you do not need to retype commands multiple times to continue using them. If you need to find a command that is not the most recent, keep pressing the up arrow to go through all previous commands.
7. Try blinking the LED by cycling through your previous commands which turned the LED on and off.
Reminder: To disconnect the microcontroller from the computer, do not just unplug it! Eject it as you would a flash drive and make sure it is safe to eject.
")